

Showing posts with label diy. Show all posts
Showing posts with label diy. Show all posts
Friday, June 7, 2013
Summery Felt Poppy Yarn Wreath
It's no secret that I'm a sucker for a colorful front door wreath, since I've made one for just about every major holiday now. But what I didn't have was a fun flowered wreath for late spring and summer. And considering that before our vacation I had been itching for a smaller, hands on project, making a wreath for our bare front door was just the thing I needed!


Tuesday, February 26, 2013
DIY Sunburst Mirror with Wood Shims
Today I wanted to share another art project that I did for our guest bedroom.

A 32" wide sunburst mirror that I made for about $43, using wood contractor shims like these.


A 32" wide sunburst mirror that I made for about $43, using wood contractor shims like these.

I've been in love with sunburst mirrors for a while now--pretty much as soon as they started appearing on design blogs. So it was finally time to jump on the bandwagon, although I wasn't about to spend $200-300 on a store bought one.
Wednesday, February 13, 2013
Downstairs Bath Renovation: It's Done! The Big Reveal
I can not tell you all how proud I feel. Our bathroom renovation, which we started at the end of July and did all by ourselves, is finally done!!!
Well, almost done, I am still waiting for our trash can to arrive in the mail, and I haven't hung the fabric covered cornice I made for the window yet (still trying to decide if the window needs it). But it is close enough to call it DONE!
If you've been reading this little blog for a while, you've probably been following the long, hard road we traveled to get here. Originally we were just planning to take down the ugly wallpaper, and bring in some new accessories to cover up the "snot yellow" tile until we were ready to rip it out in a few years. But then when we actually went to take down the wallpaper, we found mold, and decided to just move forward with the full reno. So we we ripped pretty much everything out, saving only the tub and toilet, and one wall of drywall. That came with its own issues, and we had to do a bit of regrouping and mold clean up, and take things down even further to replace the sub floors. Next came redoing the shower, sink and laundry plumbing in the shared wall, followed by putting up drywall, tiling the shower and rerunning the electrical, and then tiling the floors and putting up beadboard. Painting came next, and then we were ready to install the vanity, faucets and caulk every nook and crack in the whole room. Then came a whole lot of little touch ups, painting more trim, caulking even more. And about 400 million little things that I'm forgetting to mention. But after that, really all that was left to do was accessorize.
I'll do a follow up post, with a budget breakdown and a source list for everything in the room, but I just couldn't wait to share the transformation first!

Get ready for picture overload, because I couldn't resist showing off every aspect our beautiful new bathroom!
Well, almost done, I am still waiting for our trash can to arrive in the mail, and I haven't hung the fabric covered cornice I made for the window yet (still trying to decide if the window needs it). But it is close enough to call it DONE!
If you've been reading this little blog for a while, you've probably been following the long, hard road we traveled to get here. Originally we were just planning to take down the ugly wallpaper, and bring in some new accessories to cover up the "snot yellow" tile until we were ready to rip it out in a few years. But then when we actually went to take down the wallpaper, we found mold, and decided to just move forward with the full reno. So we we ripped pretty much everything out, saving only the tub and toilet, and one wall of drywall. That came with its own issues, and we had to do a bit of regrouping and mold clean up, and take things down even further to replace the sub floors. Next came redoing the shower, sink and laundry plumbing in the shared wall, followed by putting up drywall, tiling the shower and rerunning the electrical, and then tiling the floors and putting up beadboard. Painting came next, and then we were ready to install the vanity, faucets and caulk every nook and crack in the whole room. Then came a whole lot of little touch ups, painting more trim, caulking even more. And about 400 million little things that I'm forgetting to mention. But after that, really all that was left to do was accessorize.
I'll do a follow up post, with a budget breakdown and a source list for everything in the room, but I just couldn't wait to share the transformation first!

Friday, December 7, 2012
DIY Over Heat Register Pet Hammock
Do your pets love lying on your heat registers this time of year? My kitties were constantly seeking out the warm air blasting out of our heat registers, but it was blocking all of the warm air getting to me!
So I came up with a way that they could enjoy the warm air, without blocking the air flow.

So I came up with a way that they could enjoy the warm air, without blocking the air flow.

Friday, August 24, 2012
Craft Room Project: Under-Shelf Ribbon Spool Holder
Or alternate title: Hooray, I have something to share that doesn't have to do with our bathroom renovation! :)
We're in a bit of a holding pattern this week with the bathroom, because Lowes was out of stock of the best brand of thinset, so we're waiting until it's restocked, because ordering it online and having it shipped from somewhere else would have been crazy expensive. Makes me glad we have two other full bathrooms, so we can take as long as we need with this renovation. Also makes me glad that I actually got to work on something else, another little way to organize my craft room/home office space!

We're in a bit of a holding pattern this week with the bathroom, because Lowes was out of stock of the best brand of thinset, so we're waiting until it's restocked, because ordering it online and having it shipped from somewhere else would have been crazy expensive. Makes me glad we have two other full bathrooms, so we can take as long as we need with this renovation. Also makes me glad that I actually got to work on something else, another little way to organize my craft room/home office space!

Tuesday, June 26, 2012
4th of July Yarn Wreath
I'm back at it again, making more wreaths!

I don't know why I didn't end up making a 4th of July wreath last year, but it gave me the perfect excuse to make one this year! And a nice little hands on project like making a wreath was just what I needed, to unwind after all of the bigger, more consuming projects we've been working on lately.

I don't know why I didn't end up making a 4th of July wreath last year, but it gave me the perfect excuse to make one this year! And a nice little hands on project like making a wreath was just what I needed, to unwind after all of the bigger, more consuming projects we've been working on lately.
Tuesday, May 8, 2012
A Bright and Sunny Pantry Makeover
With contact paper chevrons!

Behold, what I spent all of last week working on. An unplanned pantry makeover!
Well, not entirely unplanned. I'd pinned a few photos a while back with cute stencils or wallpaper inside pantries, thinking that someday, when I had the free time, I'd do something fun inside our pantry.
But then we discovered the dirty pink carpet inside the pantry after we moved in. Need a reminder?


Behold, what I spent all of last week working on. An unplanned pantry makeover!
Well, not entirely unplanned. I'd pinned a few photos a while back with cute stencils or wallpaper inside pantries, thinking that someday, when I had the free time, I'd do something fun inside our pantry.
But then we discovered the dirty pink carpet inside the pantry after we moved in. Need a reminder?

Thursday, May 3, 2012
How To: Build a Custom Cat Door in a Window (Spring/Summer Edition)
On Monday you got to see a glimpse of last week's project: building a custom cat door in a window. Well, now here's how we did it!

First, I just want to say that this is a highly customized project, so I'm not going to provide you the measurements we used. It is all going to depend on what type of window you have, and you need to measure your own window anyway, to make sure you have as tight of a fit as possible. This is the 3rd of these types of custom window doors we've made (scroll all the way to the bottom of this post to see past iterations) and each one has been different, but all were based on the same principals.
Which are, make it safe for the cats, and make it so nobody can break in through it. Obviously, if someone wants to break in, they're going to do it, and can just break a window. But you don't want to make it easy for them to get in through the cat door in the window (and by the way, we know for a fact that someone tried unsuccessfully to break in through our very first cat door back in California, but they couldn't, so they broke windows instead).
Also, I should note that this is only stage one of our cat door. This design is fine for spring and summer, warmer months, but we are going to beef it up a bit come fall, to help hold in the heat for winter.

First, I just want to say that this is a highly customized project, so I'm not going to provide you the measurements we used. It is all going to depend on what type of window you have, and you need to measure your own window anyway, to make sure you have as tight of a fit as possible. This is the 3rd of these types of custom window doors we've made (scroll all the way to the bottom of this post to see past iterations) and each one has been different, but all were based on the same principals.
Which are, make it safe for the cats, and make it so nobody can break in through it. Obviously, if someone wants to break in, they're going to do it, and can just break a window. But you don't want to make it easy for them to get in through the cat door in the window (and by the way, we know for a fact that someone tried unsuccessfully to break in through our very first cat door back in California, but they couldn't, so they broke windows instead).
Also, I should note that this is only stage one of our cat door. This design is fine for spring and summer, warmer months, but we are going to beef it up a bit come fall, to help hold in the heat for winter.
Friday, March 16, 2012
Home Sweet Home Bunting and Yarn Wreath
Happy Friday! Boy am I ready for the weekend, since this week seemed to drag on forever. But I do have another project to share before the week is done with.
Apparently I've become obsessed with front door wreaths. I made my very first one at Halloween, and now I can't seem to stop myself!
As soon as I finished my St. Patrick's Day wreath, the next evening I started on another wreath, for the front door of our new house. For this one I decided to try out the wrapped yarn style, and it was so much easier than the ruffled felt one I made for St. Patrick's Day!

Making this kind of wreath is sort of a no-brainer, you just wrap yarn around and around a wreath form until it's completely covered. But I thought I'd share a couple of quick things I realized while making this.
First, when working with darker colored yarn, either use a green floral wreath form, or paint the standard white wreath form a similar color to your yarn. I just used some random blue paint I had on hand, and it made it a lot easier to not have to worry about white spots showing through as I wrapped the yarn.

Secondly, wrapping the yarn went about 2 times faster after I made this little makeshift yarn holder. For the first half of the wreath wrapping, I was just trying to hold the yarn together in a bunch, just as it came from the craft store. But the further I got, the more and more unwrapped and tangled the yarn was becoming. So I took a cardboard toilet paper roll and hot glued some cardboard ends to it, and neatly wrapped my yarn around it. This allowed me to have a lot more control over the placement of the yarn on the wreath, I could pull it tighter, and it was just a whole lot easier and quicker to do the wrapping. All in all, it probably took me two hours total to completely wrap my 16 inch wreath form, using the better portion of the yarn skein I'd purchased. But it probably would have only taken an hour if I hadn't spent the first half of my time wrestling with the unraveling yarn.

For the bunting in the middle, I just cut 1.5" wide ribbon into triangles, lightly ran a BBQ lighter over the edges to prevent them from fraying, and hot glued them to a strand of yarn.

I was sure to leave plenty of extra yarn on either side of the bunting, so I could wrap it around the wreath and glue it to the back side, allowing it to blend in.

For the felt flowers, I won't show a tutorial on them, since they're so easy, and there's a ton of tutorials already out there. Check out this one if you're interested. But basically you just cut out circles in felt, then cut a spiral into the circle, roll the felt, glue it, and you're done!
I used 3 different sizes of circles, the big flower on the top left side started as about an 8.5" felt circle, the medium sized yellow flowers were from 6" circles, and the smaller orange flowers started as 4.5" circles.
Glue some Scrabble tiles on the bunting, glue your flowers and the bunting to the wreath, and you're done!

Hanging on our new front door! Now that we have a white door, I can use some darker colors for future wreaths, which didn't work as well on our old black colored door.

Home sweet home indeed!
Anyone got any fun weekend plans? The other night we went and got supplies for scraping our popcorn ceilings, which we will be tackling this weekend. Fingers crossed it goes quickly, but I know there won't be avoiding how messy of a job it will be! I'm sure I'll be sharing how it went next week :)
Apparently I've become obsessed with front door wreaths. I made my very first one at Halloween, and now I can't seem to stop myself!
As soon as I finished my St. Patrick's Day wreath, the next evening I started on another wreath, for the front door of our new house. For this one I decided to try out the wrapped yarn style, and it was so much easier than the ruffled felt one I made for St. Patrick's Day!

Making this kind of wreath is sort of a no-brainer, you just wrap yarn around and around a wreath form until it's completely covered. But I thought I'd share a couple of quick things I realized while making this.
First, when working with darker colored yarn, either use a green floral wreath form, or paint the standard white wreath form a similar color to your yarn. I just used some random blue paint I had on hand, and it made it a lot easier to not have to worry about white spots showing through as I wrapped the yarn.

Secondly, wrapping the yarn went about 2 times faster after I made this little makeshift yarn holder. For the first half of the wreath wrapping, I was just trying to hold the yarn together in a bunch, just as it came from the craft store. But the further I got, the more and more unwrapped and tangled the yarn was becoming. So I took a cardboard toilet paper roll and hot glued some cardboard ends to it, and neatly wrapped my yarn around it. This allowed me to have a lot more control over the placement of the yarn on the wreath, I could pull it tighter, and it was just a whole lot easier and quicker to do the wrapping. All in all, it probably took me two hours total to completely wrap my 16 inch wreath form, using the better portion of the yarn skein I'd purchased. But it probably would have only taken an hour if I hadn't spent the first half of my time wrestling with the unraveling yarn.

For the bunting in the middle, I just cut 1.5" wide ribbon into triangles, lightly ran a BBQ lighter over the edges to prevent them from fraying, and hot glued them to a strand of yarn.

I was sure to leave plenty of extra yarn on either side of the bunting, so I could wrap it around the wreath and glue it to the back side, allowing it to blend in.

For the felt flowers, I won't show a tutorial on them, since they're so easy, and there's a ton of tutorials already out there. Check out this one if you're interested. But basically you just cut out circles in felt, then cut a spiral into the circle, roll the felt, glue it, and you're done!
I used 3 different sizes of circles, the big flower on the top left side started as about an 8.5" felt circle, the medium sized yellow flowers were from 6" circles, and the smaller orange flowers started as 4.5" circles.
Glue some Scrabble tiles on the bunting, glue your flowers and the bunting to the wreath, and you're done!

Hanging on our new front door! Now that we have a white door, I can use some darker colors for future wreaths, which didn't work as well on our old black colored door.

Home sweet home indeed!
Anyone got any fun weekend plans? The other night we went and got supplies for scraping our popcorn ceilings, which we will be tackling this weekend. Fingers crossed it goes quickly, but I know there won't be avoiding how messy of a job it will be! I'm sure I'll be sharing how it went next week :)
Wednesday, March 14, 2012
First (Half) Day Progress: Painting, Cabinet Removal and More!
Alternate title: And So The Fun Begins!
I already posted a little teaser of what we were up to on Monday, most importantly being closing on our first house. But a lot of other things also got accomplished that day too!
First, early Monday morning we met our realtor at the house, to do our final walk through. We wanted to be sure they'd removed the dog fence from the backyard, as per our negotiations, and also removed all of their belongings. We found the fence gone, and only a few mugs left in kitchen cabinets, and lots and lots of cobwebs and dust bunnies, so we were ok to move forward with the closing.

After our final walk through at the house, we headed to the attorney's office, where we signed a whole lot of paperwork, handed over a huge certified check, shook lots of hands, and received our glorious keys!

From there we went straight back to our new home, and just sat out on the deck for a few minutes, soaking it all in. But I couldn't sit still for too long, because I had a new wreath to hang on the front door, and photos from my last post to take. Plus, after seeing how dirty the previous owners had left the place, I was itching to do a little cleaning, so I wouldn't be afraid to touch anything! I quickly washed the kitchen counter, sink, bathroom counter, sink and toilet to be satisfied, for the moment anyway. The house will definitely need a though, possibly professional, cleaning before we move in!
Once I felt safe actually putting the things we'd brought with us on the kitchen counter, it was time to get our popcorn ceiling sample, to be sent off for asbestos testing. Now that we have the joy of paying for a new roof looming over our heads, we no longer have room in the budget to pay to have the popcorn ceilings removed. So we're going to attempt to remove them ourselves before we move in, assuming the ceilings are asbestos free.
To get the sample, we first wet down a small patch of ceiling in our laundry room with a squirt bottle of water and detergent, as recommended by the testing lab's instructions. Then, with both of us standing on stools and holding our breath, my husband quickly used a box cutter to cut a 1 inch square of the popcorn material, while I held up a plastic sandwich bag to collect the sample. We quickly wiped the ceiling with a damp paper towel to catch any potentially harmful fibers, and let out the breath that we'd been holding. From there we just took the sample to the post office and overnighted it to the testing lab. Hopefully we'll get the results back today, since this lab turns around your results within 24 hours of receiving the sample. Fingers crossed there's no asbestos in the popcorn ceilings, otherwise we'll have to go to plan B.
UPDATE! Since I wrote this post yesterday afternoon, and scheduled it to post early this morning, we've already got our asbestos test results back: negative! We'd sent the sample Express Mail, so it was guaranteed to be delivered by noon the next day. Well after I wrote and scheduled this post, we got the email with the results. I'm so happy we can move forward with the ceiling scraping ourselves. And I'd definitely recommend the testing lab we used, Western Analytical Lab, for their quick turnaround time!
After the post office, we grabbed Mediterranean take out, ate a late lunch standing at the kitchen counter, and got on with the afternoon's other projects.
First up was putting the paint samples we'd bought two weeks ago up on the walls. We're planning to keep looking at the colors on the walls for a week or two, and bring in some lamps so we can see what they look like in different lighting situations. We might also paint some of the trim white, like it's definitely going to be painted, and then do our samples right up to the white trim, for a better idea of what the final result will be. The pinky-beige color they've got on the walls (first 2 photos below) and the light baby pink (3rd photo below) they've got in the family room are making it hard for us to really see if these are the colors we like.


While our paint samples were drying, it was time to tackle our big project for the afternoon. Taking down the claustrophobic kitchen cabinets above the peninsula. When I'd first seen this house on the market this past summer, this was the first thing I'd noticed. The ugly cabinets, but the easy potential to open it all up to the breakfast nook and family room.
Here's a photo from an earlier visit to the house, with the previous owner's stuff still around. You can see from this angle how the cabinets above the peninsula are almost as wide as the counter is, giving you very little head room when working at the counter.

And a before shot, taken from standing in the kitchen, looking out to the family room.

We put down an old comforter on the counter, to protect the granite in case we dropped any tools, or the cabinets came crashing down, and proceeded to take off the doors on the cabinets, so we could access the inside.

Outer doors removed = progress!

Then came the hard part. Unlike the cabinet doors, that were just screwed on, for some reason they had decided to attach the cabinets to the ceiling with 4 inch long, thick nails. Why you wouldn't use more secure (but easier to remove) screws, I have no idea. But that probably explained why you could shake the cabinets quite a bit in the first place--nails just don't hold as well.
But getting these out was a pain, mainly because the nail heads were so flush with the wood tops of the cabinets. So after an hour and a half of slowly digging flat head screw drivers under the nail heads untilwe my husband could get the prying end of the hammer under them, we were left with about 6 really deep nails holding the cabinets to the ceiling. So at this part in the process we opted to make a run to Lowes, to get a small pry bar that would make getting under the nail heads much easier.
With the pry bar, it only took about 10 more minutes to remove the last 6 nails. Before we started the last part, we put a stool on top of the counter, to break the fall in case the cabinets came crashing down, and I was supporting the cabinets as best I could with my arms while my husband pulled out the nails. The cabinets were partially supported on the wall side by the brick back splash, so while it helped with the supporting of the cabinets, we had to be really careful when pulling the cabinets away, so as not to crack or scratch the back splash.
This thing was dang heavy, but we managed to free it from the ceiling in one piece, with the crown moulding still in place (which I'll be stealing to patch the now missing moulding sections where the cabinet was).

Here's a better look at the ceiling and where the cabinet used to be attached to the wall. Not too bad, other than the nail holes and age discoloration.

With the cabinets now in our garage until we need them (I'm thinking we might spruce them up with some paint and use them above the washer and dryer in the laundry room) we have a much more open kitchen!
Some after shots! Well, "after cabinets are removed" after shots, since this room is far, far from actually being done.


A quick look back at the room blocking cabinets.

And the wonderful openness now that they're gone!

Here you can better see the section where the cabinets used to attach to the wall. We'll be patching that up, adding crown moulding, painting it, and installing corner shelves to clean it up and get back some of the functional storage space.

You can also see in this below photo, that I'll post again, why we're alright with losing 4 kitchen cabinets worth of storage. The door on the left is to a pretty deep closet pantry, and to the right of that is where our fridge will live. On the other side of the fridge is a desk area, with shallow cabinets above it. We are planning to take out the desk and cabinets, and build new cabinets that will be as deep as the pantry and fridge will stick out, giving us a lot more storage than is there now. We think this will more than make up for losing the cabinets above the peninsula.
Actually, I almost think opening up the kitchen alone is more than enough reason to have gotten rid of the cabinets, this plan to add extra storage on the other side of the kitchen is just an added bonus! :)
Ok, last photo of our opened up kitchen. I love the look on the hub's face that seems to say "dang, that was a pain to remove, but I'm glad it's gone!"

Once we finished with the cabinet project it was nearing sundown, so we moved on to the last project of the day. We'd picked up a bird feeder and hanging arm on our Lowes run, which we hung off of the deck, so hopefully the birds will come back. On previous visits there had been a ton of pretty birds, but the previous owners took their bird feeder with them. We wanted to make sure to get another feeder up sooner rather than later, so the birds would continue to visit. The arm we got to hang the feeder on is far enough away from the deck that our kitties won't be able to reach it though!
And once we were done with all of our projects for our first half day in our new home, there was one last order of business to attend to. Having a glass of special wine on our new deck!

It's special wine because it's the wine that actually made me start to like red wine. We'd bought a case of it years ago, and had been saving the last couple of bottles for special occasions. One was on our honeymoon, on the beach in Kauai.

And the other, of course, was buying our first home!

Cheers, to many more evenings with a glass of wine on our new deck! We definitely felt like we deserved it after all we'd managed to accomplish. One thing is for sure, in this house we're never going to be bored, and it's going to be a very long time until we run out of things to do!
Do any of you like to start tackling projects as soon as you get your keys to a new place? Or do you take a little more time to relax and enjoy the place first? And has anyone else ever take down cabinets before? Was a pry bar your friend in the process?
I already posted a little teaser of what we were up to on Monday, most importantly being closing on our first house. But a lot of other things also got accomplished that day too!
First, early Monday morning we met our realtor at the house, to do our final walk through. We wanted to be sure they'd removed the dog fence from the backyard, as per our negotiations, and also removed all of their belongings. We found the fence gone, and only a few mugs left in kitchen cabinets, and lots and lots of cobwebs and dust bunnies, so we were ok to move forward with the closing.
Monday night I'd mentioned that a lot of realtors seem to not put out sold signs these days (and the seller's realtor didn't even put out a pending sign in front of the house either). But our realtor brought her own sign to snap a photo for her own purposes, so as we walked back to our car I jumped in for a quick photo. Too bad all the signage was gone when we got back from the closing, otherwise we wouldn't have needed my back up sold sign bunting!

After our final walk through at the house, we headed to the attorney's office, where we signed a whole lot of paperwork, handed over a huge certified check, shook lots of hands, and received our glorious keys!

From there we went straight back to our new home, and just sat out on the deck for a few minutes, soaking it all in. But I couldn't sit still for too long, because I had a new wreath to hang on the front door, and photos from my last post to take. Plus, after seeing how dirty the previous owners had left the place, I was itching to do a little cleaning, so I wouldn't be afraid to touch anything! I quickly washed the kitchen counter, sink, bathroom counter, sink and toilet to be satisfied, for the moment anyway. The house will definitely need a though, possibly professional, cleaning before we move in!
Once I felt safe actually putting the things we'd brought with us on the kitchen counter, it was time to get our popcorn ceiling sample, to be sent off for asbestos testing. Now that we have the joy of paying for a new roof looming over our heads, we no longer have room in the budget to pay to have the popcorn ceilings removed. So we're going to attempt to remove them ourselves before we move in, assuming the ceilings are asbestos free.
To get the sample, we first wet down a small patch of ceiling in our laundry room with a squirt bottle of water and detergent, as recommended by the testing lab's instructions. Then, with both of us standing on stools and holding our breath, my husband quickly used a box cutter to cut a 1 inch square of the popcorn material, while I held up a plastic sandwich bag to collect the sample. We quickly wiped the ceiling with a damp paper towel to catch any potentially harmful fibers, and let out the breath that we'd been holding. From there we just took the sample to the post office and overnighted it to the testing lab. Hopefully we'll get the results back today, since this lab turns around your results within 24 hours of receiving the sample. Fingers crossed there's no asbestos in the popcorn ceilings, otherwise we'll have to go to plan B.
UPDATE! Since I wrote this post yesterday afternoon, and scheduled it to post early this morning, we've already got our asbestos test results back: negative! We'd sent the sample Express Mail, so it was guaranteed to be delivered by noon the next day. Well after I wrote and scheduled this post, we got the email with the results. I'm so happy we can move forward with the ceiling scraping ourselves. And I'd definitely recommend the testing lab we used, Western Analytical Lab, for their quick turnaround time!
After the post office, we grabbed Mediterranean take out, ate a late lunch standing at the kitchen counter, and got on with the afternoon's other projects.
First up was putting the paint samples we'd bought two weeks ago up on the walls. We're planning to keep looking at the colors on the walls for a week or two, and bring in some lamps so we can see what they look like in different lighting situations. We might also paint some of the trim white, like it's definitely going to be painted, and then do our samples right up to the white trim, for a better idea of what the final result will be. The pinky-beige color they've got on the walls (first 2 photos below) and the light baby pink (3rd photo below) they've got in the family room are making it hard for us to really see if these are the colors we like.
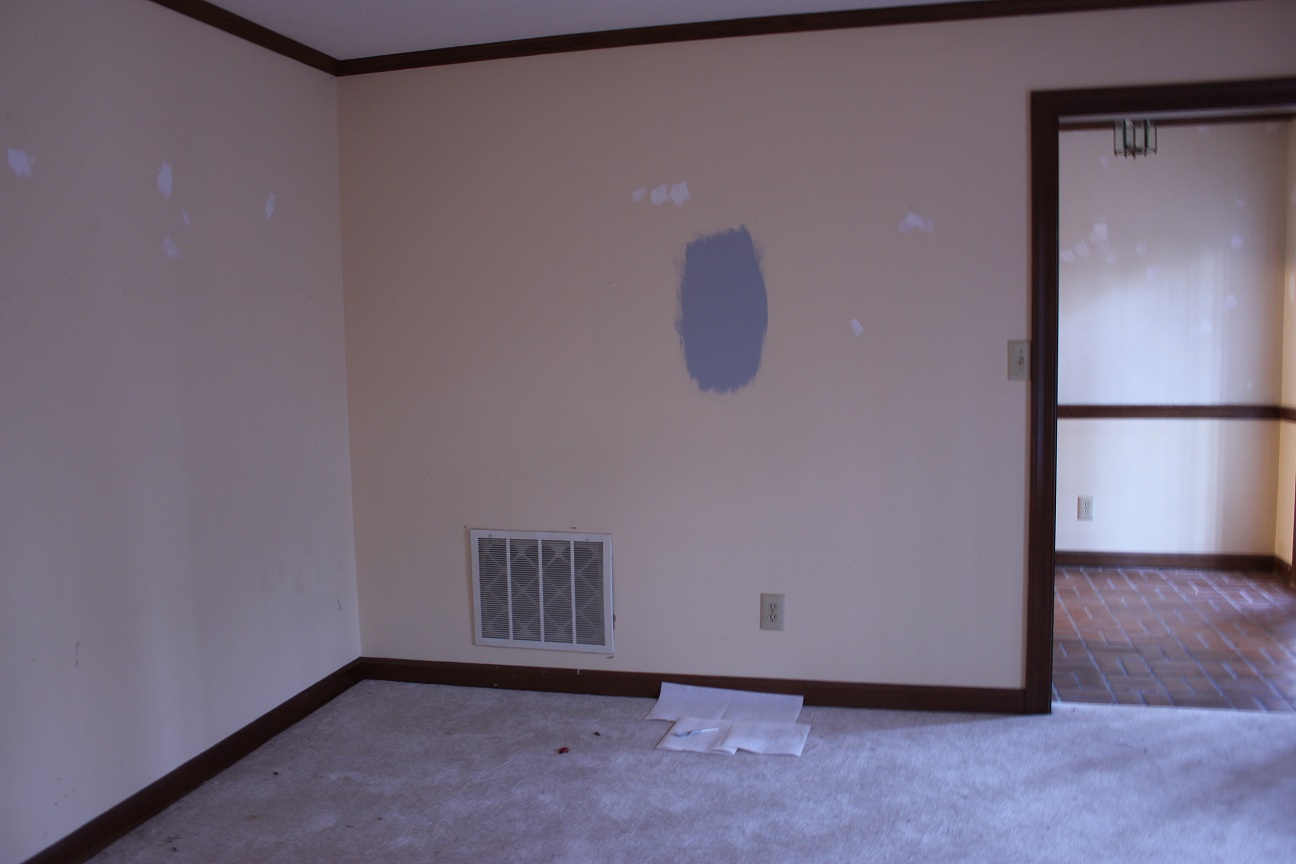

(We painted two color samples the dining room, because I want to do the dark all over, then follow it with the lighter grey stenciled above the chair rail. Once the ugly pink/beige wall paper is removed from above the rail, of course!)

(This blue looks so much lighter and brighter surrounded by baby pink paint. I definitely think a bigger patch, next to white trim is going to help us really see what this color will look like)
While our paint samples were drying, it was time to tackle our big project for the afternoon. Taking down the claustrophobic kitchen cabinets above the peninsula. When I'd first seen this house on the market this past summer, this was the first thing I'd noticed. The ugly cabinets, but the easy potential to open it all up to the breakfast nook and family room.
Here's a photo from an earlier visit to the house, with the previous owner's stuff still around. You can see from this angle how the cabinets above the peninsula are almost as wide as the counter is, giving you very little head room when working at the counter.

And a before shot, taken from standing in the kitchen, looking out to the family room.

We put down an old comforter on the counter, to protect the granite in case we dropped any tools, or the cabinets came crashing down, and proceeded to take off the doors on the cabinets, so we could access the inside.

(Yes, that banister and post will also be going away soon! Actually, pretty much most everything in this picture will be going away/getting updated!)
Outer doors removed = progress!

Then came the hard part. Unlike the cabinet doors, that were just screwed on, for some reason they had decided to attach the cabinets to the ceiling with 4 inch long, thick nails. Why you wouldn't use more secure (but easier to remove) screws, I have no idea. But that probably explained why you could shake the cabinets quite a bit in the first place--nails just don't hold as well.
But getting these out was a pain, mainly because the nail heads were so flush with the wood tops of the cabinets. So after an hour and a half of slowly digging flat head screw drivers under the nail heads until
With the pry bar, it only took about 10 more minutes to remove the last 6 nails. Before we started the last part, we put a stool on top of the counter, to break the fall in case the cabinets came crashing down, and I was supporting the cabinets as best I could with my arms while my husband pulled out the nails. The cabinets were partially supported on the wall side by the brick back splash, so while it helped with the supporting of the cabinets, we had to be really careful when pulling the cabinets away, so as not to crack or scratch the back splash.
This thing was dang heavy, but we managed to free it from the ceiling in one piece, with the crown moulding still in place (which I'll be stealing to patch the now missing moulding sections where the cabinet was).

Here's a better look at the ceiling and where the cabinet used to be attached to the wall. Not too bad, other than the nail holes and age discoloration.

With the cabinets now in our garage until we need them (I'm thinking we might spruce them up with some paint and use them above the washer and dryer in the laundry room) we have a much more open kitchen!
Some after shots! Well, "after cabinets are removed" after shots, since this room is far, far from actually being done.

I can't wait until we get rid of the post and railing, but this is still a huge improvement with the cabinets removed.

A quick look back at the room blocking cabinets.

And the wonderful openness now that they're gone!

Here you can better see the section where the cabinets used to attach to the wall. We'll be patching that up, adding crown moulding, painting it, and installing corner shelves to clean it up and get back some of the functional storage space.

You can also see in this below photo, that I'll post again, why we're alright with losing 4 kitchen cabinets worth of storage. The door on the left is to a pretty deep closet pantry, and to the right of that is where our fridge will live. On the other side of the fridge is a desk area, with shallow cabinets above it. We are planning to take out the desk and cabinets, and build new cabinets that will be as deep as the pantry and fridge will stick out, giving us a lot more storage than is there now. We think this will more than make up for losing the cabinets above the peninsula.
Actually, I almost think opening up the kitchen alone is more than enough reason to have gotten rid of the cabinets, this plan to add extra storage on the other side of the kitchen is just an added bonus! :)
Ok, last photo of our opened up kitchen. I love the look on the hub's face that seems to say "dang, that was a pain to remove, but I'm glad it's gone!"

Once we finished with the cabinet project it was nearing sundown, so we moved on to the last project of the day. We'd picked up a bird feeder and hanging arm on our Lowes run, which we hung off of the deck, so hopefully the birds will come back. On previous visits there had been a ton of pretty birds, but the previous owners took their bird feeder with them. We wanted to make sure to get another feeder up sooner rather than later, so the birds would continue to visit. The arm we got to hang the feeder on is far enough away from the deck that our kitties won't be able to reach it though!
And once we were done with all of our projects for our first half day in our new home, there was one last order of business to attend to. Having a glass of special wine on our new deck!

It's special wine because it's the wine that actually made me start to like red wine. We'd bought a case of it years ago, and had been saving the last couple of bottles for special occasions. One was on our honeymoon, on the beach in Kauai.

And the other, of course, was buying our first home!

Cheers, to many more evenings with a glass of wine on our new deck! We definitely felt like we deserved it after all we'd managed to accomplish. One thing is for sure, in this house we're never going to be bored, and it's going to be a very long time until we run out of things to do!
Do any of you like to start tackling projects as soon as you get your keys to a new place? Or do you take a little more time to relax and enjoy the place first? And has anyone else ever take down cabinets before? Was a pry bar your friend in the process?
Wednesday, March 7, 2012
St. Patrick's Day Wreath
AKA, the last wreath I'll ever make for our current front door. Or AKA, the ruffled felt style of wreath I'll probably never make again because it was a PITA!

I'd been seeing lots of ruffled felt wreaths on Pinterest the past few months, and was itching to try one myself. I even pinned this heart shaped wreath, wondering if I could make four of these hearts and group them to look like a four leaf clover.

However, Michaels was out of heart shaped wreath forms, so on the spot I decided just get a regular 16 inch wreath form, and I'd do something with wooden hearts left over from my Valentine's Day wreath, to create a four leaf clover. This would have been my first mistake, that made this project a PITA. I love 16 inch wreaths for front doors, but they're huge when you have to cover them with tiny, folded felt circles.
Tracing and cutting out the circles to make the ruffles was pretty time consuming. I bought a piece of green felt that was 72" x 36" and used nearly all of it to cut out 2.5" circles, that I traced onto the felt before cutting it.

Luckily I realized early on that I could fold the felt three times and pin it before cutting my circles, making things slightly quicker.

But it still took forever, and is why I'll probably not make a wreath like this again.

I used a dot of hot glue to hold my circles together, once I folded them.
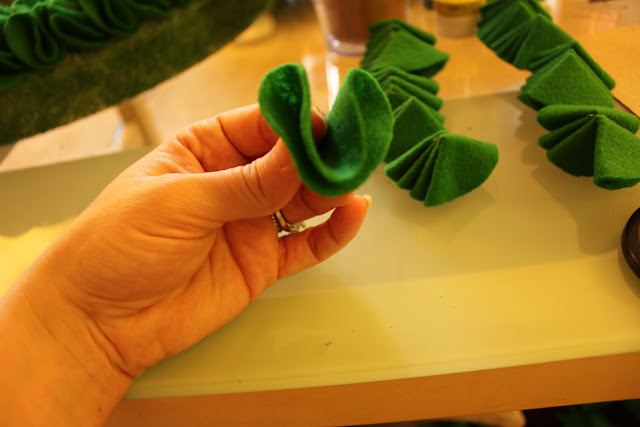
And I also used hot glue to attach them to the wreath form. I still don't understand the point of using pins to attach the felt, which is what I've seen tutorials recommend. To me, hot glue is quicker, means no risk of pricking your finger, and it's a lot more secure than pins would be.
Also, you'll notice that I painted my wreath form. Yeah, should have bought a green one to begin with, but when I had to change my plans at the last minute in Michaels, it didn't occur to me until later.

After the hours and hours (and hours!) of cutting circles, folding them and gluing them, I painted some wooden hearts green, that were leftover from my Valentine's Day wreath.

I glued the big hearts to a little heart on the back side, which worked to hold the hearts in a four leaf clover, and as a spacer to position the clover off of the wreath about a half inch, so it wouldn't be lost in the ruffles.

All in all, I probably spent about 8 hours making this dang wreath. It was definitely one of those projects that you start to hate about half way through. Especially when I've been working 10-12 hour days at my job the last few weeks--I resented the wreath taking up my precious little free time.
But the end result was very cute, so all the time was probably worth it. It's just too bad that I didn't finish it sooner, since I only got to hang this last night, and snap some quick pictures this morning. At least there's ten more days until St. Patrick's Day to enjoy it!


I think my favorite part is the four leaf clover. I painted a layer of sparkles over the green paint, to add a little more depth.

Ah, ruffles! Love the look, not the work. Craft stores really need to start selling perfectly sized, pre-cut felt circles. It would be such a time saver, and considering the number of ruffled felt wreaths I've seen lately, they would make a killing.
Have you made one of these popular ruffled felt wreaths? Did it take you a ridiculous amount of time to finish too?

I'd been seeing lots of ruffled felt wreaths on Pinterest the past few months, and was itching to try one myself. I even pinned this heart shaped wreath, wondering if I could make four of these hearts and group them to look like a four leaf clover.
However, Michaels was out of heart shaped wreath forms, so on the spot I decided just get a regular 16 inch wreath form, and I'd do something with wooden hearts left over from my Valentine's Day wreath, to create a four leaf clover. This would have been my first mistake, that made this project a PITA. I love 16 inch wreaths for front doors, but they're huge when you have to cover them with tiny, folded felt circles.
Tracing and cutting out the circles to make the ruffles was pretty time consuming. I bought a piece of green felt that was 72" x 36" and used nearly all of it to cut out 2.5" circles, that I traced onto the felt before cutting it.

Luckily I realized early on that I could fold the felt three times and pin it before cutting my circles, making things slightly quicker.

But it still took forever, and is why I'll probably not make a wreath like this again.

I used a dot of hot glue to hold my circles together, once I folded them.
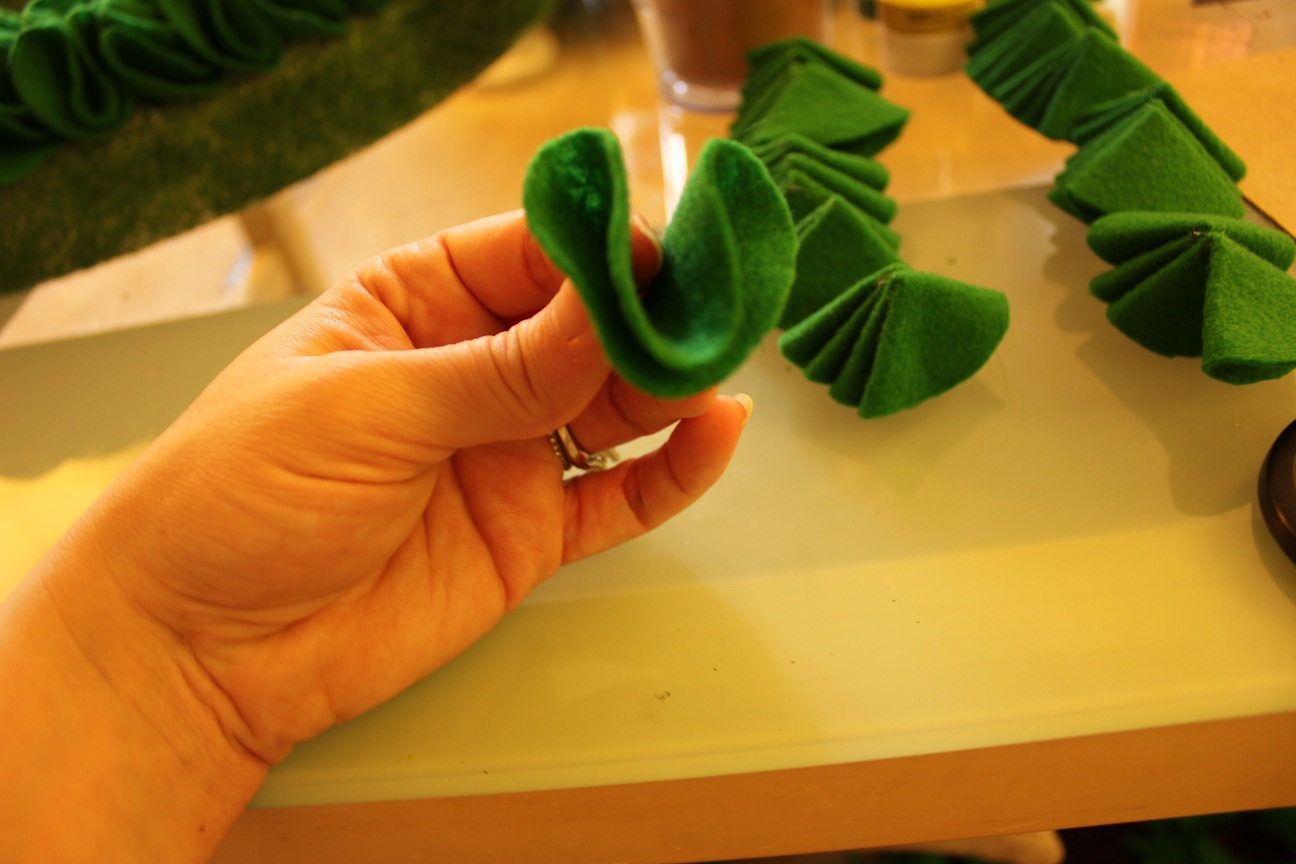
And I also used hot glue to attach them to the wreath form. I still don't understand the point of using pins to attach the felt, which is what I've seen tutorials recommend. To me, hot glue is quicker, means no risk of pricking your finger, and it's a lot more secure than pins would be.
Also, you'll notice that I painted my wreath form. Yeah, should have bought a green one to begin with, but when I had to change my plans at the last minute in Michaels, it didn't occur to me until later.

After the hours and hours (and hours!) of cutting circles, folding them and gluing them, I painted some wooden hearts green, that were leftover from my Valentine's Day wreath.

I glued the big hearts to a little heart on the back side, which worked to hold the hearts in a four leaf clover, and as a spacer to position the clover off of the wreath about a half inch, so it wouldn't be lost in the ruffles.

All in all, I probably spent about 8 hours making this dang wreath. It was definitely one of those projects that you start to hate about half way through. Especially when I've been working 10-12 hour days at my job the last few weeks--I resented the wreath taking up my precious little free time.
But the end result was very cute, so all the time was probably worth it. It's just too bad that I didn't finish it sooner, since I only got to hang this last night, and snap some quick pictures this morning. At least there's ten more days until St. Patrick's Day to enjoy it!


I think my favorite part is the four leaf clover. I painted a layer of sparkles over the green paint, to add a little more depth.

Ah, ruffles! Love the look, not the work. Craft stores really need to start selling perfectly sized, pre-cut felt circles. It would be such a time saver, and considering the number of ruffled felt wreaths I've seen lately, they would make a killing.
Have you made one of these popular ruffled felt wreaths? Did it take you a ridiculous amount of time to finish too?


Welcome


*The Handcrafted Life* All rights reserved © 2011 |
I am a HowJoyful Design by Joy Kelley |
 |